

How to Sanitize Water Storage Containers Before Filling Them
Water storage is one of the most important parts of emergency preparedness, but many people focus only on how much water to store or which container to buy. One essential step is often overlooked: sanitizing the container before filling it.
Even a brand-new water storage container may contain dust, manufacturing residue, or contaminants picked up during shipping and storage. Reused food-grade containers can also harbor bacteria, mold, or leftover residue if they aren’t cleaned properly. Filling a dirty container with clean drinking water can reduce its quality and shorten its safe storage life.
Fortunately, sanitizing water storage containers is simple and only takes a few minutes. Using the right supplies and following a proven method helps reduce the risk of contamination and gives your stored water the best chance of staying safe over time.
In this guide, you’ll learn which containers should be sanitized, what supplies you’ll need, the exact steps recommended by public health authorities, and the common mistakes to avoid before storing emergency drinking water.
Why You Should Sanitize Water Storage Containers
When people think about water safety, they often focus on the quality of the water itself. However, the cleanliness of the container is just as important. Even perfectly safe drinking water can become contaminated if it’s poured into a container that hasn’t been properly sanitized.
There are several reasons why sanitizing containers before use is recommended:
Manufacturing Residue
New containers aren’t sterile. During manufacturing, packaging, and transportation, they can collect:
- Plastic dust
- Fine debris
- Residual manufacturing oils
- Dirt from warehouses
- Airborne contaminants
Although these residues may not always be visible, removing them before storage helps ensure cleaner drinking water.
Bacteria and Mold
Containers that have been stored in garages, sheds, or basements may collect:
- Dust
- Moisture
- Mold spores
- Bacteria
If the container has previously held food or beverages, microscopic residue can encourage bacterial growth over time.
Cross-Contamination
Many households reuse food-grade containers to store emergency water. While this can be safe, any leftover residue from previous contents can affect both the taste and quality of stored water.
Containers that have ever held chemicals, pesticides, automotive fluids, or cleaning products should never be used for drinking water storage, even after cleaning.
Longer Storage Life
Sanitizing doesn’t make water last forever, but it reduces the number of microorganisms introduced during storage.
Combined with:
- safe drinking water,
- food-grade containers,
- proper storage conditions,
- and a regular rotation schedule,
clean containers help maintain better water quality over the long term.
Related: Before choosing a container, compare different options in Best Water Storage Containers for Emergency Preparedness. Once your water is stored, follow a Water Storage Rotation Schedule to keep your emergency supply fresh.
Which Containers Should Be Sanitized?
The short answer is all containers used for drinking water storage should be sanitized before they’re filled, whether they’re brand new or have been used before.
Here are the most common types of containers used for emergency water storage.
Food-Grade Plastic Water Jugs
Portable water jugs are one of the most popular choices for households because they’re easy to fill, carry, and rotate.
Sanitize them:
- before the first use,
- after every complete refill,
- and after long periods of empty storage.
Stackable Water Bricks
Water bricks are designed for compact storage and can last for many years.
Because they often have narrow openings, it’s especially important to shake the sanitizing solution thoroughly so it reaches every interior surface.
55-Gallon Water Barrels
Large emergency water barrels can hold enough water for weeks, but their size also makes sanitation more important.
Before filling:
- wash away dust or residue,
- sanitize the entire interior,
- sanitize the lid and bung openings,
- use clean pumps and hoses during filling.
Stainless Steel Water Containers
Stainless steel is durable and resistant to corrosion, but it still requires proper cleaning before long-term storage.
Use the same sanitation process recommended for other food-safe drinking water containers.
Reused Food-Grade Containers
Some people reuse containers that previously held food products such as:
- juice
- vinegar
- soda syrup
- bottled water
These containers can sometimes be reused safely if they are food-grade and thoroughly cleaned and sanitized.
Avoid containers that once held:
- chemicals
- detergents
- fuel
- pesticides
- non-food liquids
No amount of cleaning can guarantee these containers are safe for drinking water.
Related: Learn How to Store Water Long Term after your containers have been properly sanitized to maximize the quality and shelf life of your emergency water supply.
Supplies You’ll Need
Before you begin, gather a few simple household supplies. Having everything ready makes the process faster and helps prevent accidental contamination.
Unscented Household Bleach
Choose regular, unscented liquid household bleach that contains sodium hypochlorite. Avoid products labeled as scented, splashless, color-safe, or those containing added cleaners, as they are not intended for drinking water sanitation.
Fresh bleach is more effective than old bleach, so replace bottles that are well past their recommended shelf life.
Clean Water
Use potable tap water or another safe drinking water source for washing and preparing the sanitizing solution.
Mild Dish Soap
A small amount of dish soap helps remove dust, grease, and visible residue before sanitizing.
Remember that cleaning and sanitizing are two separate steps. Soap removes dirt, while the bleach solution disinfects surfaces.
Measuring Spoon or Measuring Cup
Accurate measurements help create the proper bleach solution without using too much or too little disinfectant.
Funnel (Optional)
A clean food-grade funnel makes filling narrow containers easier while reducing spills and contamination.
Protective Gloves (Optional)
If you have sensitive skin or are sanitizing multiple large containers, disposable gloves can make the job more comfortable.
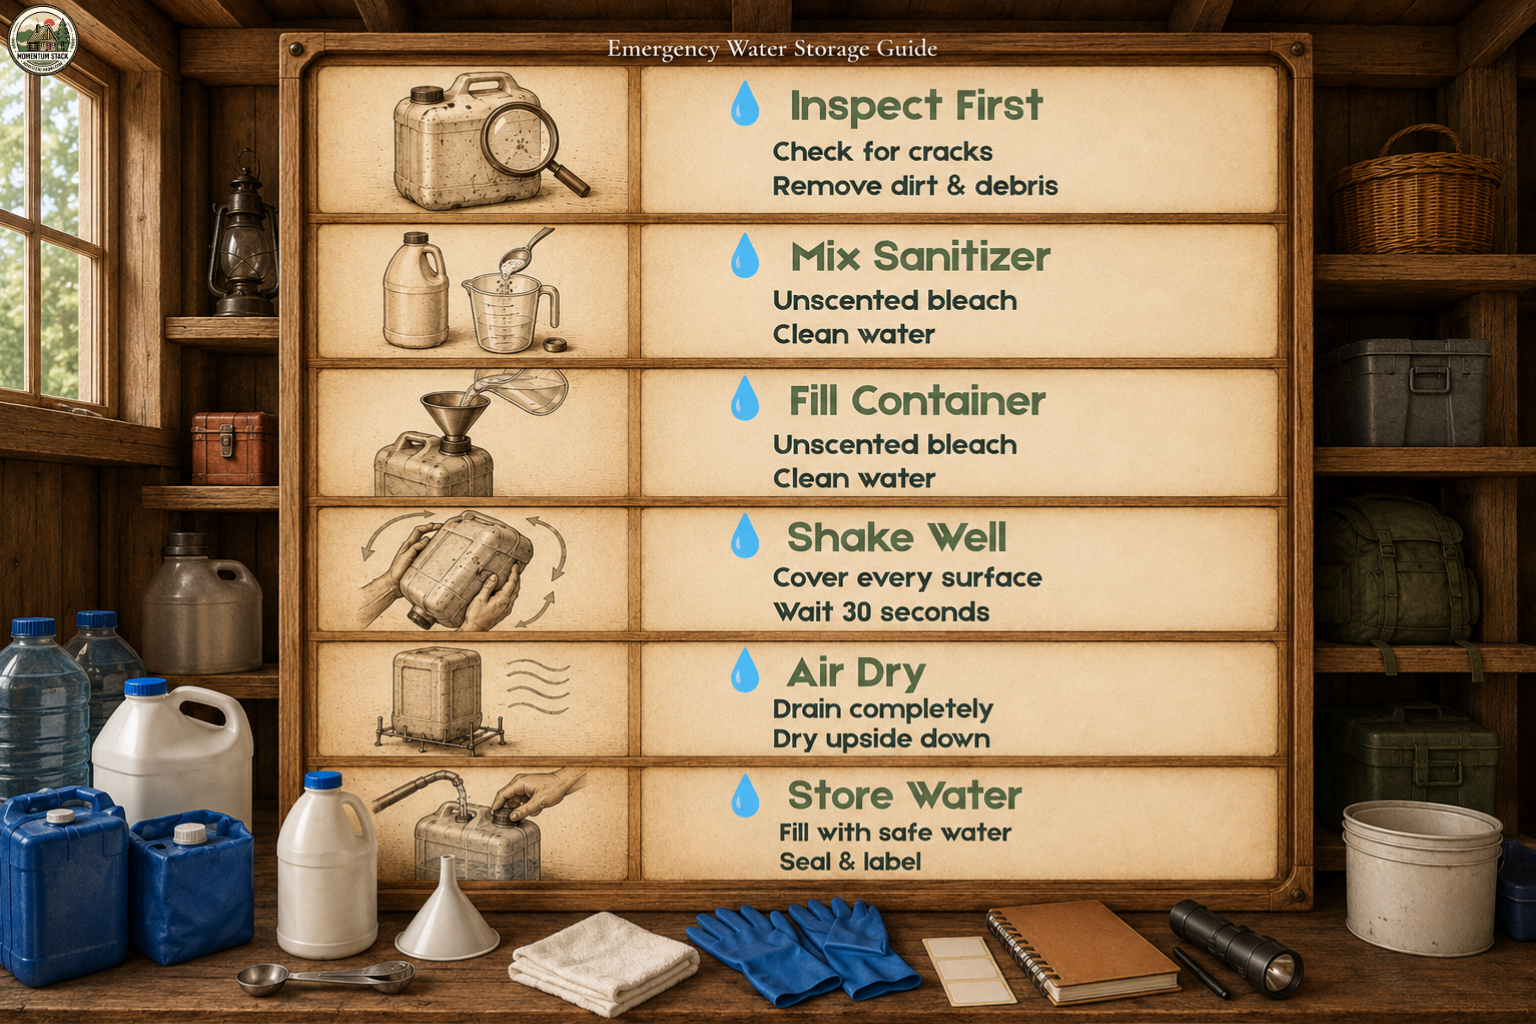
Step-by-Step: How to Sanitize Water Storage Containers
The sanitation process is straightforward and only takes a few minutes per container. Following each step carefully helps ensure the inside surfaces are properly disinfected before adding drinking water.
Step 1: Wash the Container
Begin by washing the inside of the container with warm water and a small amount of mild dish soap.
If possible:
- scrub the interior with a clean brush,
- pay attention to corners and threads around the opening,
- wash the lid and cap separately.
Rinse thoroughly with clean water to remove all soap residue before moving to the sanitizing step.
Step 2: Prepare a Sanitizing Solution
Mix a sanitizing solution using:
- 1 teaspoon (5 mL) of unscented household bleach (5–9% sodium hypochlorite)
- 1 quart (about 1 liter) of clean water
This dilution is recommended by the CDC for sanitizing drinking water containers before storage.
Step 3: Sanitize Every Interior Surface
Pour the solution into the container.
Close the lid securely and gently shake or rotate the container so the solution coats:
- the bottom,
- the sides,
- the neck,
- the opening,
- and the inside of the cap.
For large barrels that cannot be shaken, slowly roll or tilt the barrel so the solution contacts all interior surfaces.
Step 4: Let the Solution Sit
Allow the bleach solution to remain in contact with every surface for at least 30 seconds before emptying it.
This contact time helps disinfect the container effectively without requiring a long soaking period.
Step 5: Drain the Sanitizing Solution
After the solution has remained inside the container for at least 30 seconds, carefully pour it out.
If you’re sanitizing several containers, prepare fresh sanitizing solution as needed rather than reusing the same mixture for an extended period.
Do not leave bleach solution inside the container longer than necessary.
Step 6: Air Dry the Container
Allow the container to air dry completely before filling it with drinking water.
The CDC recommends allowing sanitized containers to dry naturally or rinsing them with already safe drinking water if desired. Avoid wiping the inside with towels, as even clean cloths can reintroduce bacteria or lint.
Keep the lid off while drying to allow moisture to evaporate.
Step 7: Fill with Safe Drinking Water
Once the container is dry, fill it with potable drinking water from a trusted source.
If you’re filling from municipal tap water that is already treated and safe to drink, no additional treatment is usually necessary.
If the water source is uncertain, purify or disinfect the water before storing it.
Fill the container as close to the top as practical to reduce the amount of trapped air, then seal it tightly with a clean lid.
Finally, label the container with:
- Filling date
- Water source (optional)
- Planned inspection or rotation date
Proper labeling makes it much easier to maintain your emergency water supply over time.
Related: After filling your containers, read How Long Does Stored Water Last? to learn when stored water should be inspected or replaced.
Should You Rinse After Sanitizing?
This is one of the most common questions about emergency water storage.
In most cases, rinsing is not required if you’ve used the correct sanitizing solution and allowed the container to drain properly.
If you prefer to rinse, only use water that is already known to be safe for drinking.
Never rinse a sanitized container with untreated well water, lake water, or any questionable water source, as this can immediately reintroduce microorganisms.
If you’re unsure about your water quality, allowing the container to air dry is generally the safer option.
Common Mistakes to Avoid
Even a simple sanitizing process can become less effective if a few important details are overlooked.
Using Scented or Splashless Bleach
Only regular, unscented household bleach containing sodium hypochlorite should be used.
Avoid:
- Scented bleach
- Splashless formulas
- Color-safe bleach
- Bleach products with added detergents or fragrances
These products are not intended for sanitizing drinking water containers.
Forgetting to Clean Before Sanitizing
Bleach disinfects surfaces but doesn’t remove dirt or residue.
Always wash the container with soap and water first.
Cleaning and sanitizing work together—they are not interchangeable.
Touching the Inside After Sanitizing
After the container has been sanitized, avoid touching:
- the interior,
- the opening,
- the underside of the lid.
Clean hands don’t guarantee sterile surfaces.
Using Dirty Funnels or Pumps
Many people sanitize the container but forget about the equipment used to fill it.
Funnels, siphon pumps, hoses, and measuring cups should also be clean before they come into contact with drinking water.
Leaving Containers Open
Open containers can collect:
- dust,
- insects,
- airborne debris,
- mold spores.
Seal containers immediately after filling.
Skipping Labels
Without labels, it’s difficult to remember:
- when water was stored,
- when it should be inspected,
- when it should be rotated.
A simple waterproof label can save confusion months later.
Related: Build a maintenance routine with our Water Storage Rotation Schedule to keep every container organized.
How Often Should Water Containers Be Sanitized?
Sanitizing is not a one-time task.
For the best results, sanitize containers:
- Before using a brand-new container
- Before every refill
- After a container has been emptied
- After long-term empty storage
- Anytime contamination is suspected
If you notice unusual odors, visible residue, mold, or dirt inside a container, clean and sanitize it again before adding fresh water.
Developing a regular cleaning routine is one of the simplest ways to improve the safety of your emergency water supply.
Frequently Asked Questions
Can I sanitize water containers with vinegar instead of bleach?
Vinegar is useful for removing mineral deposits and some surface residue, but it is not considered an effective disinfectant for emergency drinking water containers. Public health agencies recommend using an appropriate bleach solution for sanitizing containers intended for drinking water.
Do brand-new containers need to be sanitized?
Yes. New containers may contain dust, packaging debris, or manufacturing residue. Sanitizing them before first use is a simple precaution that helps protect stored water quality.
Can I reuse milk jugs for emergency water storage?
Generally, no.
Milk proteins and fats are difficult to remove completely, creating conditions that may encourage bacterial growth. Food safety experts typically recommend purpose-built food-grade water containers instead.
What if my container smells like bleach afterward?
A slight chlorine smell is usually harmless and often fades after the container is filled with drinking water.
If the odor is very strong, you may rinse the container with safe drinking water before filling it.
Should I sanitize the lid too?
Absolutely.
The lid, cap, gasket, and threads all come into contact with drinking water and should be cleaned and sanitized along with the container.
How long does the sanitizing process take?
Most containers can be completely cleaned and sanitized in 10–20 minutes, depending on their size and drying time.
Final Thoughts
Storing emergency water isn’t only about choosing the right container or calculating how many gallons your household needs. The condition of the container itself plays a major role in keeping stored water safe over time.
By washing away residue, sanitizing every interior surface, allowing the container to dry properly, and filling it with safe drinking water, you reduce the risk of contamination before storage even begins.
Combined with proper storage conditions and a regular rotation schedule, this simple maintenance routine can help ensure your emergency water supply is ready whenever you need it.
If you’re building a complete preparedness system, your next step is learning how to store filled containers correctly and maintain them throughout the year.
Quick Checklist: How to Sanitize Water Storage Containers
✅ Wash the container with mild dish soap and clean water
✅ Rinse away all soap residue
✅ Mix 1 teaspoon (5 mL) of unscented household bleach (5–9% sodium hypochlorite) with 1 quart (about 1 liter) of water
✅ Pour the solution into the container
✅ Coat every interior surface
✅ Let it sit for at least 30 seconds
✅ Drain the solution
✅ Air dry or rinse with safe drinking water if preferred
✅ Fill with potable drinking water
✅ Seal tightly and label the filling date
Building a complete emergency water storage system? Continue with these practical guides:
How Much Water Should You Store for Emergencies?